I have a backlog of stuff I should post about. Today, no comic, but here’s something I did in April, explained in excessive detail.
The short version:
We tested different ratios of glue to water, glued a bunch of blocks together, and broke ’em the next day. Some broke cleanly on the joint, some vaguely on the joint, and some broke elsewhere.
The long version:
Questions:
In what proportions should we mix hide glue? Most will say it depends on what you’re gluing. For gluing a top on, some folks go for something a little weaker, because that top should come off cleanly for repairs. But for a center joint, no one wants that to come apart ever.
For a joint to come apart “cleanly” implies the joint is weaker than the wood. If surrounding wood breaks before the joint does when evenly stressed, we can assume the glue joint is stronger than the wood.
At school we are taught to cover the glue crystals twice over with water. Some people say add water until the crystals are just covered. Others give ratios by mass. What kind of results do these guidelines produce, and what are the percentage thresholds that give clean breaks vs. partial breaks vs. breaks next to the joint?
Is higher concentration always stronger? Does thicker glue have workability issues that adversely affect the strength of the final joint?
Procedure:
Glue: Milligan & Higgins, 192 gram strength. It’s the rather murky stuff that the Chicago School has been using for a while now.
Mixing: The percentages I chose are supposed to approximate visual ratios by volume, because we are used to just eyeballing it at school. We’ve been taught to add water to cover the glue flakes twice over (in other words, 1:2 visual ratio), so for this test, I used a visual ratio of 1:1 for the upper limit (weighing out at 39% glue) and 1:3 for the lower limit (at 11%, that is definitely too watery).
| sample number | visual ratio (volume) | % by mass | glue | water | total |
| 1 | ~ 1:1 | 39% | 5.0g | 7.8g | 12.8g |
| 2 | 35% | 5.0g | 9.3g | 14.3g | |
| 3 | 31% | 5.0g | 11.1g | 16.1g | |
| 4 | 27% | 5.0g | 13.5g | 18.5g | |
| 5 | 23% | 5.0g | 16.7g | 21.7g | |
| 6 | ~ 1:2 | 19% | 5.0g | 21.3g | 26.3g |
| 7 | 15% | 5.0g | 28.3g | 33.3g | |
| 8 | ~ 1:3 | 11% | 5.0g | 40.5g | 45.5g |
I put 5g of dry hide glue in each jar, then added water to make the desired ratios for testing. I waited about half an hour before putting the jars in the hot water (~140ºF).
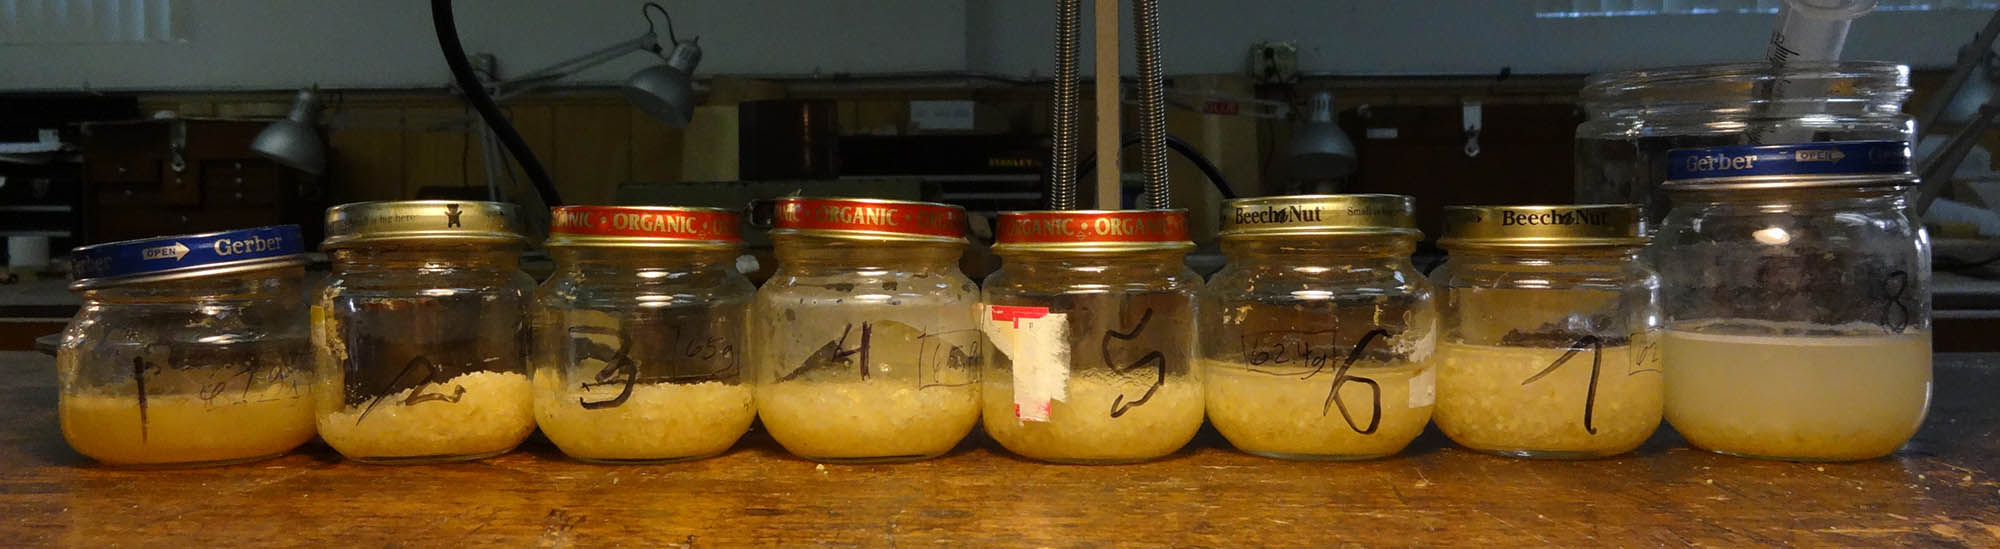
8 jars of hide glue flakes dissolving in water. Jar 1 is 39% glue (by mass), jar 8 is 11% (ridiculously watery…)
Joint samples: I thicknessed a board of some riftsawn softwood (pine?) to about 12mm. I ripped the board in half, and planed the two halves side by side with a strong hollow. I labeled and sawed the boards into 8 pairs to glue back together.
For each pair, I applied the appropriate glue sample on both jointing surfaces together, closed them together, placed them on glass, and drove a wedge between one side and a fence to provide some clamping force. The time elapsed between applying glue and clamping was around 10 seconds each.

All 8 samples came from one board, which was ripped lengthwise, planed side by side, then chopped into 8 pairs, and reglued.
I left them to dry overnight before handling (~16 hours). I planed them to the same thickness and cut them to the same height, hopefully eliminating any bias from unevenness. All the joints looked good – no glue lines, no gaps.
Final dimensions of each sample before breaking: 12mm x 140mm x 50mm
The Break Test: We broke each piece by increasing pressure in the vise with a jig. The jig had to be modified a few times because I didn’t anticipate how much the wood could deform before breaking.

Our breaking jig got modified 3 times because we didn’t anticipate just how flexible those pieces of wood were.
Everyone played with each jar of glue to hypothesize how each consistency would behave before we broke them. A big point of the test was to see how our perception of glue would line up with the results.
Results:
Jar 1 (39%) and Jar 2 (35%) produced breaks away from the joint.
Jar 3 (31%), Jar 4 (27%) and Jar 5 (23%) gave partial breaks.
We consider Jar 6 (19%) to be a clean break, though a few pieces at the edge of the joint did stick.
Jar 7 (15%) and Jar 8 (11%) resulted in clean breaks very quickly.

> 35% broke away from the joint (suggesting the joint was stronger than the wood) 23% – 31% gave a partial break on the joint < 19% gave a clean break
Analysis: The results were more or less in line with students’ hypotheses. Most expected Jar 3 to produce a stronger joint than it did, suggesting that we can mix glue just a little bit thicker than we thought for applications where we need a strong joint. Some expected Jar 1 to produce a partial break, citing the problem of thick glue gelling up. This did not pose a problem for this particular gluing application, where the working time was about 10 seconds.
Your results may vary depending on many many factors. Your hide glue might be different. Fresh glue and glue a few days old behave differently. Working time is a big factor. The list goes on. Best thing for you would be to try it yourself!
Suggestions for follow-up tests, criticism of this test, and questions are very welcome! Comment below or on Youtube.