math

Fingerboard Geometry Part 2: Scoop vs. Radius

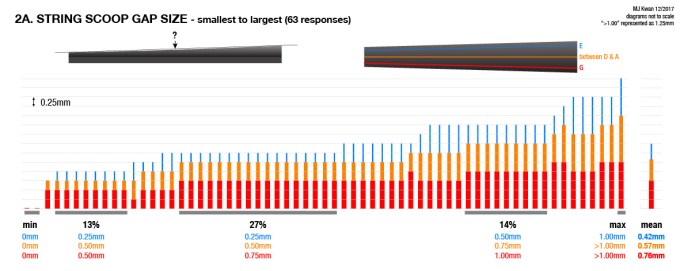
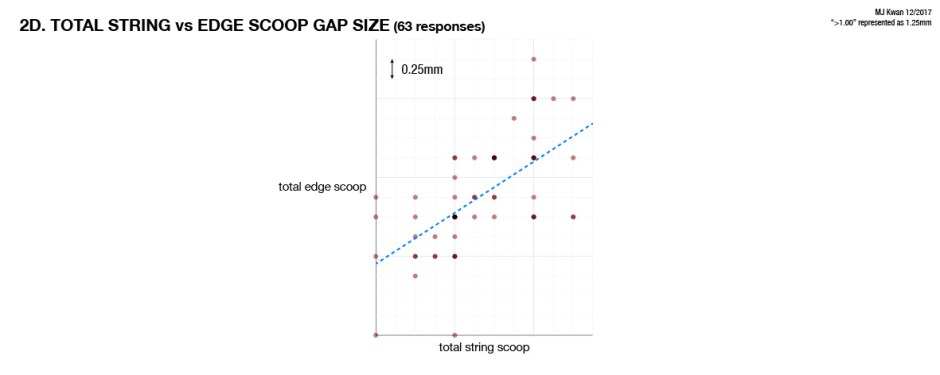
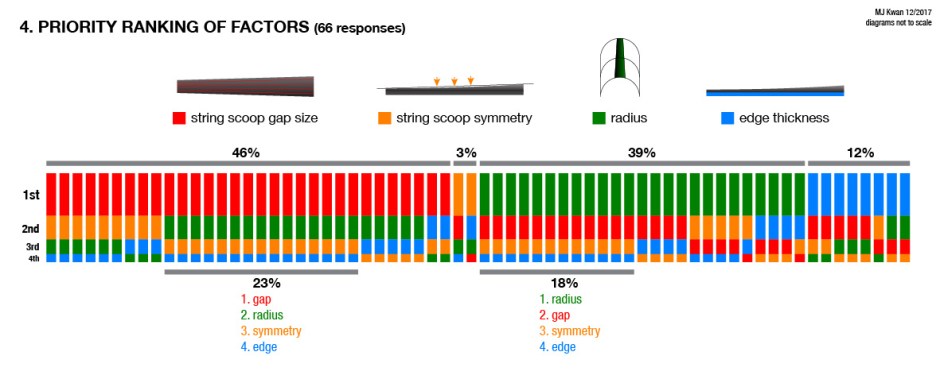
As seen in our survey results, scoop gaps along string paths and the cross profile radius were regarded as highest priority.

The model I am using to study their interaction is a grid of 3×3 points. Think of it as 3 smaller radii crosswise (usually around 42mm), and 3 giant arcs lengthwise (representing scoop gaps under G, E, and down the centerline).

FB radius v scoop gap-01

Each of the 9 points are connected to a cross radius and the lengthwise scoop radii, so trying to force definitions on all 6 radii doesn’t always work. That’s too many constraints, like saying, “I want a right triangle with sides of 2, 3, and 4.”

Here, I’ll define 4 of the radii completely, and show the relationship between the remaining two. All solutions along the graphed lines are geometrically compatible with the constraining dimensions specified in the subtitles (which are based on median survey results).


Middle crosswise radius vs Center-line scoop gap

FB radius v scoop gap-02

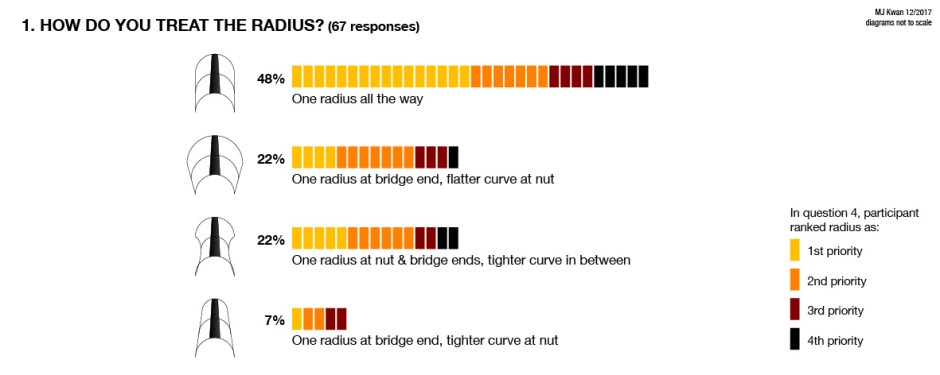
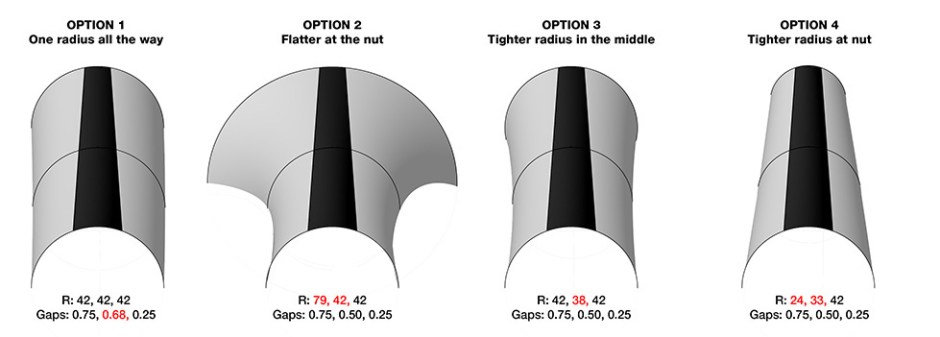
Option 1 (one radius all the way) from our survey is the only one where all crosswise radii are defined. But one of the three scoop gaps can’t be set to our target without changing the middle radius. In this case, with G scoop set to 0.75mm and E set to 0.25mm, the center-line gap comes out to 0.68mm, or 36% over our target of 0.50mm. 

If we instead prioritize our scoop gaps, setting them to 0.75mm, 0.50mm, and 0.25mm, we can calculate the middle radius out to 38mm, which matches our survey’s Option 3 (tighter radius in the middle).

Some survey participants have observed this phenomenon:

I’ve made fingerboards for respected [players] that prefer an even radius along the whole board, but there will wind up being more scoop on the center strings, which makes the string heights higher than the g string in the middle of the board.

Note that our target scoop gaps decrease linearly from G to E. Some makers intentionally skew the gradation of scoop gaps, reasoning that players may not perceive the larger gap due to similar tensions and diameters of the G and D strings. It is difficult to draw conclusions about scoop gap skewing trends from the survey, because responses were given to the nearest 0.25mm.

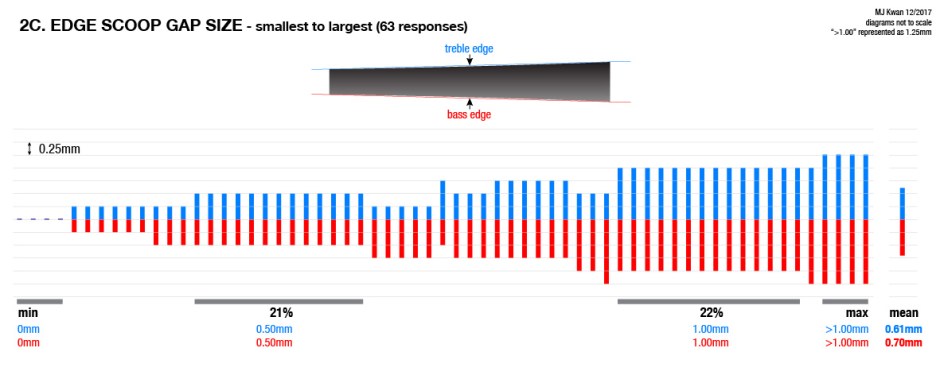
Below are a few other gap size permutations from our survey.

FB radius v scoop gap-03

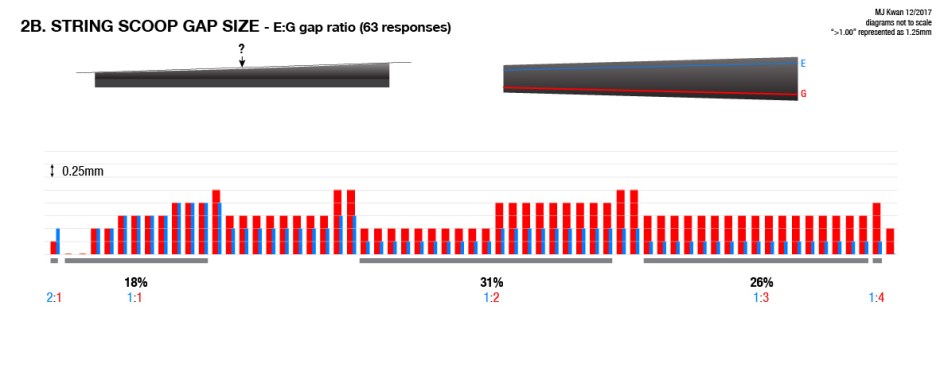
Note that in every case with nut & bridge radii set to 42mm, for the centerline scoop size to be halfway between G and E, the middle radius always comes out 38mm. As the middle radius flattens from 38mm, the centerline gap skews toward G. The tighter the radius (<38mm), the more it skews toward E.


Crosswise radius of the nut vs middle

FB radius v scoop gap-04

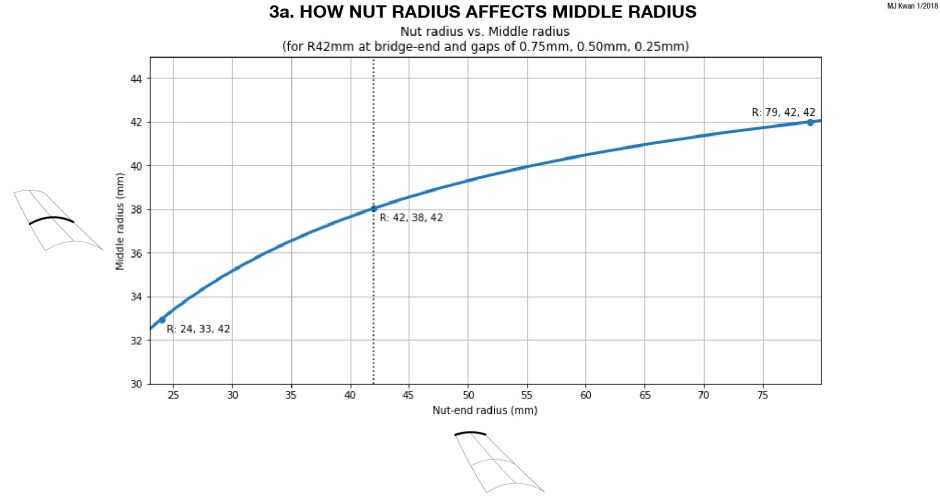
Those who selected Option 4 (tighter radius at the nut) describe it as a section of a cone, with radius changing proportionally to the width of the fingerboard.

Option 2 (flatter radius at the nut) respondents did not give specific numbers about how much flatter. It turns out that gradually increasing the radius toward the nut as I had described in the survey does not produce a plausible solution for our given gap sizes. In general, for a flatter nut radius, the middle radius will still tighten relative to the bridge end.

As shown in Fig 2b, when a centerline gap size is halfway between G and E, the relationships between the crosswise radii are practically identical. Here is another way of looking at that:

FB radius v scoop gap-05


tl;dr

Here are some geometrically plausible dimensions:

options1-4


The differences we are talking about are tiny (though maybe not to a player). Here’s what they’d look like under your 42mm radius template:
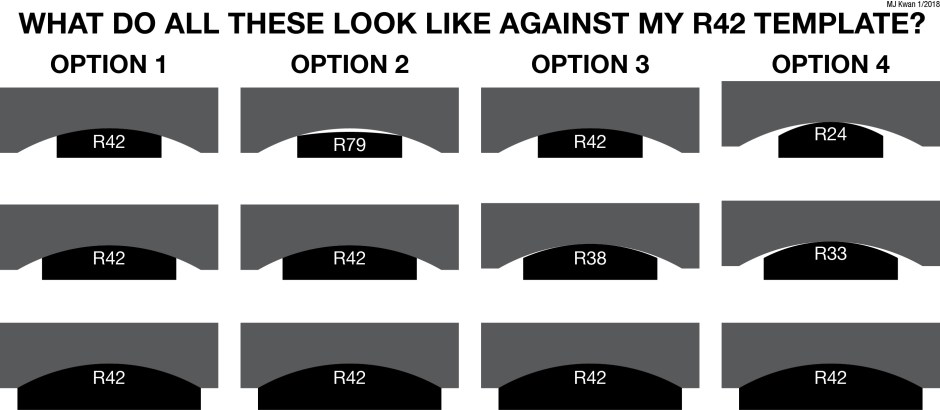
templates

Have fun!!!!


Coming soon…

I will tell you how to go all Traité de Luthérie so you can resolve your own favorite dimensions! Or if you’re too lazy, I’ll give you an Onshape CAD file to play with.

Advertisement

Fingerboard Geometry Part 1: Survey dimensions

Here are the results of the survey, with 67 responses collected between 12/19 – 12/25.

Participants were asked pick answers that best described their mental model of a typical violin fingerboard. If their concept of fingerboard dimensions were not well-described by the given answers, they were asked to pick the closest answer and elaborate about discrepancies in the comments section.


Fingerboard radius


48% One radius all the way; 22% One radius at bridge, flatter at nut; 22% One radius at nut & bridge, flatter in middle; 7% One radius at bridge, tighter at nut

Remarks from participants who selected…

Option one (one radius all the way):

I initially plane a consistent radius but this is slightly altered in the middle portion as a result of asymmetrical scooping. –Mitch McCarthy

Essentially an adjustment to the position relative to the centerline in combination with an adjustment to its height of said radius along the length gives the resultant change in width and edge heights.

Option two (flatter curve at the nut end):

Roundness at the bridge end keeps the middle strings from being in a hole in the upper positions (the string doesn’t need to be depressed as far) making double stopping and bowing easier. Flatter at the nut means the left hand doesn’t have to climb over the strings and chords are easier to play cleanly.

… more flat closer to the nut to give a “security sensation” to the musician, I meant for their finger to press the string, I think that my base of my concept the relation with the bridge radius. –Martin Cruz Aragon

Option three (one radius at nut & bridge ends, tighter curve in between):

I’ve made fingerboards for respected [players] that prefer an even radius along the whole board, but there will wind up being more scoop on the center strings, which makes the string heights higher than the g string in the middle of the board.

I actually make the board 42 at the bridge end slightly tighter in the middle and slightly flatter at the nut. –Nathan Slobodkin

Option four (narrower curve at nut end):

The radius is tighter at the nut, and then flattens out as it widens toward the bridge, allowing dead purchase for double stops and such in high positions. –Chris Jacoby

I am limiting this analysis to arcs, but some participants noted that their cross-sectional profiles were not arcs (parabolic, “egg-shaped,” etc).


String scoop gap size

String scoop gap size - mean: G 0.72mm, D/A 0.57mm, E 0.42mm; min: G/D/A/E 0; max: G >1.00mm, D/A >1.00mm, E 1.00mm; mode (27%): G 0.75mm, D/A 0.50mm, E 0.50mm


survey results-03

Many players commented that string scoop was dependent upon various factors: string heights, string diameter and properties, player preference & style of playing, etc.


Edge scoop gap size

edge scoop gap size smallest to largest


The treble and bass scoop gaps were symmetrical for the majority of responses.

For asymmetrical edge scoops, bass side was deeper than treble for all but one participant, who explains that:

… reaching over the strings comes from the treble side of the board so I put a little more scoop on this side to facilitate this action.


Apparent edge thickness

One participant remarks:

I make the edge thickness the same instead of measuring side scoop.

Those who use edge scoop to achieve uniform edge thickness would need a deeper edge scoop for deeper string scoops, explaining why most asymmetrical responses have heavier gaps on the bass side.

This is also observable in general by correlating string scoop and edge scoop:

Total string scoop vs edge scoop


survey results-06

Lifting the floor of the bridge end of the fingerboard is another method for achieving a more uniform edge thickness.


String scoop symmetry

survey results-07

Remarks:

I try to get a consistent radius curve throughout the scooping. That means that, for me, scoop centering is irrelevant.

… generally centered on fb, if anything slightly towards nut with the thought that the further away from the bridge the fingering point is, the smaller the angle between the string and fingerboard, requiring more clearance. –Mitch McCarthy

With a bit of thought, it’s apparent that scoop is only important close to nut. –Jim Biggs

I did not receive comments about scoop centering from participants who bias the depth toward the bridge.


Priority rankings

survey results-08

Many participants cited player style and player preference as the main determining factors for the dimensions used. The overall highest ranked factors are string scoop size and radius fidelity.


Coming soon…

The geometric interactions between scoop gap and the radius at nut, middle, and end will be discussed in greater depth in my next post.

Thanks to everyone involved in this survey.

Zulagen hurts my brain

Hey kids! Winter break’s over, so here’s a puzzle to thaw out your brain.

You know those mental rotation exercises that are all like this:

Mental rotation exercise puzzle with Beijing's CCTV tower

Well today I give you a violin maker’s variation on that exercise.

I almost broke my brain making zulagens. Zulagens are little helpers that redirect clamping force to where you want for glue-ups. Here, a page out of my notes to explain how it’s used:

0104 zulagen

This zulagen pushes on the ends of the C-bout ribs, and the serrated face reduces slip during clamping. It’s important for the two sides that push the ribs to be squared up nicely. Before you serrate the face, this is what you want:

0104 quiz 1

No light passing through the inside edges of your square.

But this ain’t your regular blocky block! The square reads diagonally across the reference surface (labeled “DOWN”). Sure, you can just flatten your DOWN surface and then square up each angled face individually, but why make it so easy when you can make it WAY HARDER THAN YOU NEED TO?!?!

THE ZULAGEN PUZZLE

Turn on your planing brain, it’s time to figure out how to square up the two angled faces with minimal planing.

Based on the light passing under the edge of the square, where should you remove material if you wanna get the job done in one go? Each question has ONE SINGLE ANSWER ONLY!

EXAMPLE

Let’s do the first one together:

0104 quiz B

The face on the right is fine and good, so the answer has to be A or B. The other answers would affect the squareness of the right face (Remember? Square goes diagonal on reference surface). The left face is reading bigger than 90, so you want to decrease the angle. The right answer is B.

Okay, you’re on your own now. Hover over the image for the answer. Remember, pick only one.

1.

Get warmed up with this one, which is similar to the example.

zulagen mental rotation planing puzzle 1

2.

Now for the good stuff.

0104 quiz 2

3.

0104 quiz 3

4.

0104 quiz 4

So, how’d you do? Comment below if you want to brag (or whimper, or correct me, or point out some technicality that invalidates the whole thing).

And now, circularity for closure.

escher cctv tower

Calculate spindle speed using absolute pitch!

Note: if you hate math, skip this post.

This is how I looked during a 12+ minute cycle on the mill:

long cycle cnc boredom

So, what better way to entertain myself than to guess the spindle speed based on the MERRRRRP pitch??

You can play along too!

Here’s what I had to work with:

1110 rpm 2

Mary Jane is working on the mill in a factory. She hears an E pitch three octaves below concert pitch A. Knowing that the pitch is created by a tool spinning at a certain speed, and knowing that concert pitch A is 440Hz, how fast is the tool spinning in rpm (rotations per minute)?

Easy peasy! But I have not taken a math class since senior year of high school, over 10 years ago. Granted, the last math class I took was multivariable calculus… so I have a decently developed conceptual grasp of math, but I’m very horribly out of practice. When you’re done solving the problem, scroll down to see how my poor brain stumbled through.

1110 rpm 3

1110 rpm 5

1110 rpm 4

Only 9 rpm off! Enough to break a tap, sure, but still! That might have been the most gratifying use of absolute pitch in the history of MJ.