
“… I don’t think I’ll be able to hold this for 30 seconds.”
Note: the theory of why we prep our plates this way is my interpretation. I don’t know how badly I’ve already distorted what my teacher said.
“… I don’t think I’ll be able to hold this for 30 seconds.”
Note: the theory of why we prep our plates this way is my interpretation. I don’t know how badly I’ve already distorted what my teacher said.
Some assembly required….
The final chart is gonna look craaaaaaaazyyyy. When I finish the other parts, maybe I’ll have to combine it all, dress it up all pretty with color, and make prints of it.

There are some fancy schmancy chicken food & water dispensers out there, and they cost a lot of money. There are several different designs out there, but the main ideas behind the good dispensers are all the same:
1. They only put out a little bit of food or water at a time, so the goods stay cleaner, and there is less waste.
2. They hold a lot of food & water so you don’t have to change or refill often. They keep feed clean and dry and protected from unwanted critters and creatures.
3. They are easy to refill when you need to.
4. They are hard to tip over, minimizing waste.
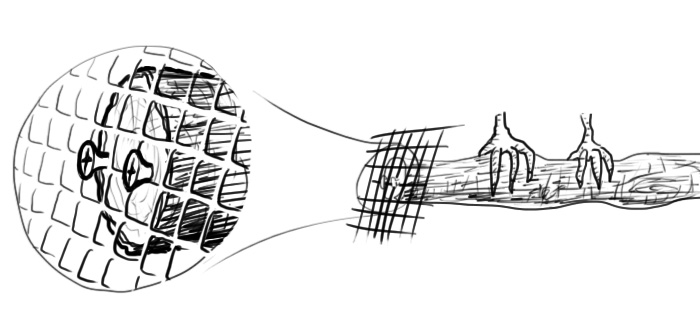
We made a gravity feeder for Maxine’s chicken tractor, and have it hanging underneath the roost so it won’t get super poo-ed. Food is stored in a piece of gutter from Home Depot (less than $3) and a plastic container that held mushrooms from the grocery store.

We poked one hole towards the lower end of each gutter face, and two holes in each face (except the bottom) of the mushroom container. Then we strung a string through as shown above to attach the containers together. Then we filled it with feed.

The chickens eat from the bottom, and the weight of the feed pushes more into the bottom for the chicken to eat.
I think this one passes the first three criteria above. If your chickens peck viciously, the bottom tray does tilt a little. Perhaps in version 2.0, we would tie knots to keep the string from sliding around and rearranging the hanging angle.
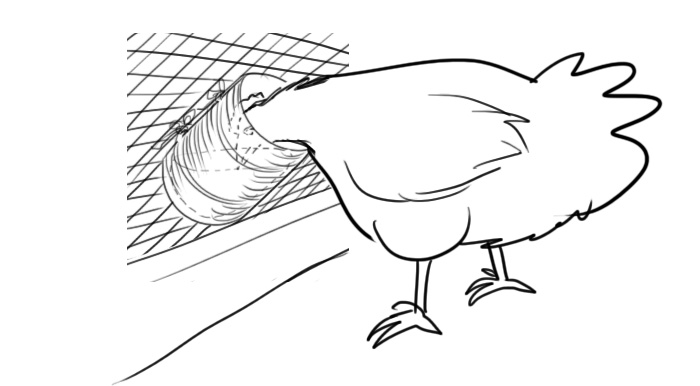
This is very low-tech but pretty effective. All it is is a ribbed tin can tied to the hardware cloth. Refilling is easy (just pour water through the hardware cloth and down into the can). Since it is mounted to the angled part of the hardware cloth, birds can’t sit right on top and poo down into it. It doesn’t hold tons of water, but I think it’s better to be changing water often anyway. And you can install several according to how frequently you want to refill it. So, this system passes criteria #1, 3, and 4.
These big branches are nice for the birds to hang out on in the run area. But how to attach? Credit goes to my sister for this very simple mounting technique. Drive two screws into the end grain. Lift the stick into the A-frame section and it will grab onto some of the hardware cloth.
Today we discuss the making of the chicken tractor, without the drama.

The following chart is what it would cost, not what we paid. We spent a bit more (sorry, Max), because we bought extra of a few things (mainly OSB, due to errors and then design changes). Though we also made use of scrap or leftovers from previous projects.
| material | unit cost | quantity | subtotal |
|---|---|---|---|
| Pressure-treated 2×4, 12′ | $5.57 | 3 | $16.71 |
| 2×3, 8′ | $1.92 | 5 | $9.60 |
| OSB 7/16″, 4′ x 8′ | $8.45 | 1 | $8.45 |
| Corrugated Metal Roof Panel, 26″ x 8′ | $19.49 | 1 | $19.49 |
| 1″ Teks Roofing Screws with neoprene washers (box of 120) | $9.88 | 1 | $9.88 |
| 2.5″ Exterior Wood Screw (1 lb box) | $6.71 | 1 | $6.71 |
| 1″ Exterior Wood Screw (1 lb box) | $6.71 | 1 | $6.71 |
| 1/2″ Hardware Cloth, 3′ | ~$2.00 / lf | ~11 ft | ~$22.00 |
| 3″ Strap Hinges (pack of 2) | $3.27 | 1 | $3.27 |
| TOTAL | $102.82 |
(Nerd note: I’ve always wanted to use an html table in an appropriate context!!! ie not for formatting my angelfire/geocities pages 10 years ago!)
Other stuff we used that may or may not cost ya:
Chicken tractor construction, animated in gifs.

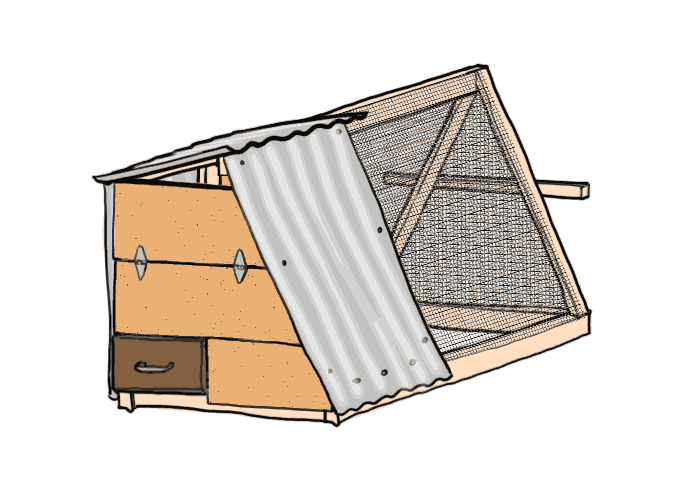
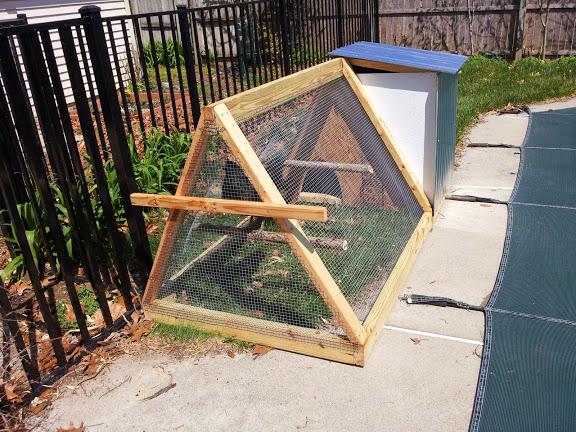
Floor size: 3′ x 6′
Height: ~3′
For 3 chickens, this is a bit on the small side.
The run area is 3′ x 4′.

That OSB wall and its little mini-studs were assembled before sliding into place on the A frame.

Tediously cut your hardware cloth with wire cutters. Careful! It’ll draw bloood. Staple directly onto the frame.
Roost access door is strap hinged.

This was our first experience with sawing through metal and using those Teks screws with built-in squishy stuff to prevent leaking through the roof.
We ripped this drawer from my sister’s old kitchen counters. The box itself is about 11″ x 18″.

The coop is a bit tight, but miraculously, even the puffball Buff Orpington can fit down the 8″ ramp, and through the tiny door (which is maybe an 10″ high triangle.)
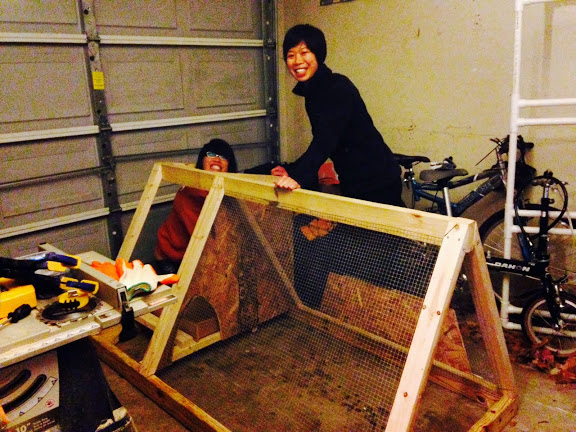
In case you forgot, it rained, so we took the job inside.

Peek-a-boo. See? The tiny door prevents human-sized predators from crawling in and attacking them in their chicken house at night.
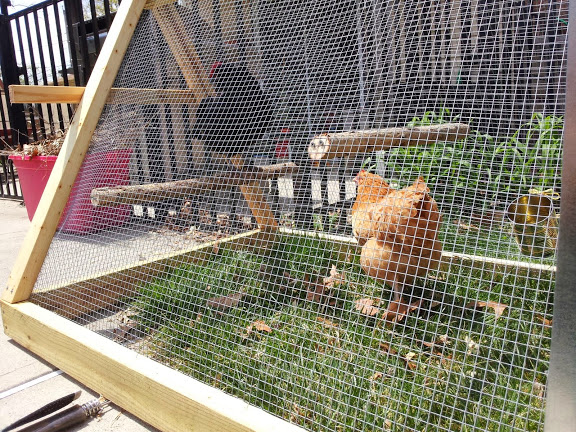
Ameraucana and Buff Orpington hanging out, and a shy Rhode Island Red hiding inside.
Ta-da! All nice and… half-primed.
I’m still on session break from violin-making school, so violin-related posts will resume next week. Can’t wait to see my möbius strip bass bar!
In the meantime, next post will STILL be about chickens — troubleshooting and accessories.

My 2nd trimester at CSVM has ended and I’m on break. Last thing I did was try to finish my bass bar in a huge panic, and well… let’s just say adrenaline is unhelpful for very fine knife work.
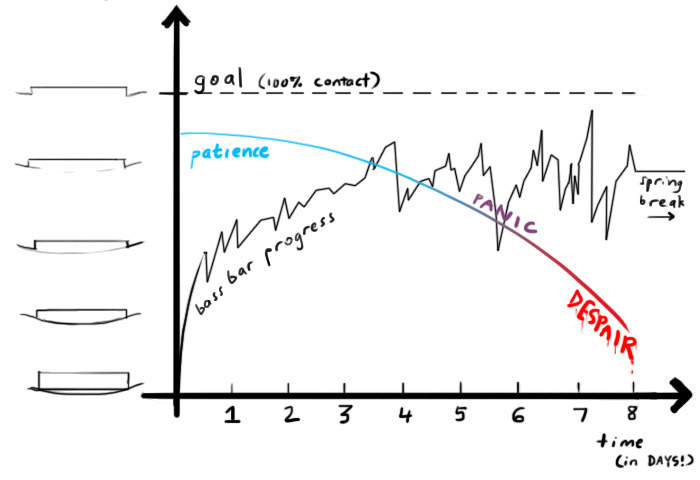
Several upperclassmen recounted horror stories of unfinished bass bars warping and twisting over breaks. This happens to be the LONGEST break we get – 3.5 weeks – and it’s spring, so I know Chicago will go from frozen to warm to thunderstorm to sun several times. Everyone has told me I can’t expect to pick up where I left off before break… and maybe I will have to restart completely!

In fact, with all the stories people love to tell, I think now I might be disappointed if I am greeted by anything short of this:

