A trustworthy new brass fingerplane will cost you some $50-$70. You need a few different sizes, times two, for flat-bottom and round-bottom. That’s a lot of money.
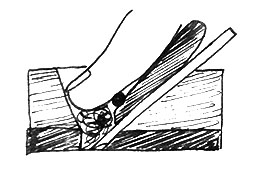
So make your own out of wood! I love wooden fingerplanes – they are lighter, wooden tools feel nicer in your hand, and they sound a little different from the brass ones.
Here’s what I’ve learned from making my 3 wooden planes. This is a general post, and I’ll go into more detail over the next couple posts.
The type of plane we’re making here is based on the sandwiched Krenov style / crosspin + wedge / whatever you want to call it.
Ingredients
- BLADE. This is your constant. You will build your plane based on the width and thickness of your blade. The sizes we’re working with at school are 3/8″, 1/2″, and 1″ wide, all O2 untempered steel stock that we have to cut, shape, harden and temper ourselves.
- BODY WOOD. Something stable and not too soft. Since we are violin makers, maple is plentiful and will do fine (but maybe don’t use that pink streaky low-density stuff we get for our first instrument). Grain orientation for the body is not crucial for tiny planes, but I’ll go into further detail on that in a future post.
- SOLE WOOD. If you can manage it, get some quartersawn very hard wood for the sole. Some folks are using bubinga, ipe, ironwood, ebony, rosewood, etc. Most of the dense, tight-grained tropicals are supposed to work well for this, though I did make one out of purpleheart and it turned out to be surprisingly/disappointingly mushy! Keep a little extra of this sole wood for the wedge. Straight grain will make life easier but if it’s interlocking, you’ll live.
- CROSS PIN. Use a metal rod of some sort. Make sure you have an appropriate drill bit for it.
Design Considerations
Plane making is really not that difficult. If you haphazardly slap some wood together, chisel out an opening, pin it, and stick a wedge and blade in it, you’ll probably have a functional plane. But if you plan ahead, these little points could make the difference between a plane that functions and a plane you loooove.
On any plane, the area right in front of the throat takes the most wear.

You need to find a balance between supporting that area, and having space to relieve wood shavings. On a small plane, the space for chip relief fills up very very fast, especially if you tend to stick your finger in it.
As you redress your plane, the throat will get larger and larger, so consider ways to minimize that. In violin making, finger planes are used for arching, but they do not produce the finished surface, so a tiny throat (which is supposed to reduce tear-out) is not as important as it would be on, say, a smoothing plane. Still, a giant throat on any plane disturbs me… 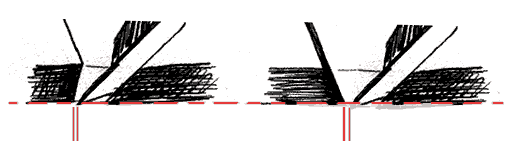 For a small finger plane, if you keep your plane sole reasonably thick, this configuration is my happy medium for achieving a roomy chip receptacle and well-supported throat that will stay somewhat small with each redressing.
 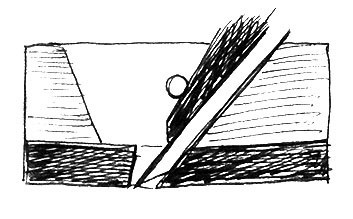 My finger planes are mostly for arching and/or some edge work, so I’m just sticking with the traditional 45° bed angle, blade bevel down. Low angle is supposedly better for cutting endgrain, high angle is supposedly better for figure.
Cross pin placement should not be mindlessly done. Factoring in blade thickness and wedge shape, you’ll end up a line of acceptable cross pin placement. Again, you’ll have to strike a balance. The lower you place the pin, the better the support near the cutting edge, which should help reduce blade chatter. Don’t go too close though, or your wedge will have less room to do its job without getting in the way of chip flushing.
The wedge pushes up on the pin pretty forcefully, so consider your final shape and make sure you have enough meat above the pin.
Consider how you tend to grip your finger plane. I hold really really tiny tiny planes a little differently from just kinda tiny planes. Consider how the final shape of your plane and your grip on it could affect some of the other design points.
Next post will be on actual construction.
I’d like to give a little shout out to my friend David Finck, who I met at Oberlin. He is the author of Making & Mastering Wood Planes, which would make an excellent gift for any of your woodworking or luthier plane nerd friends.